TEXT DESCRIPTIONS ARE BELOW THE DIAGRAM
DOING A SESSION
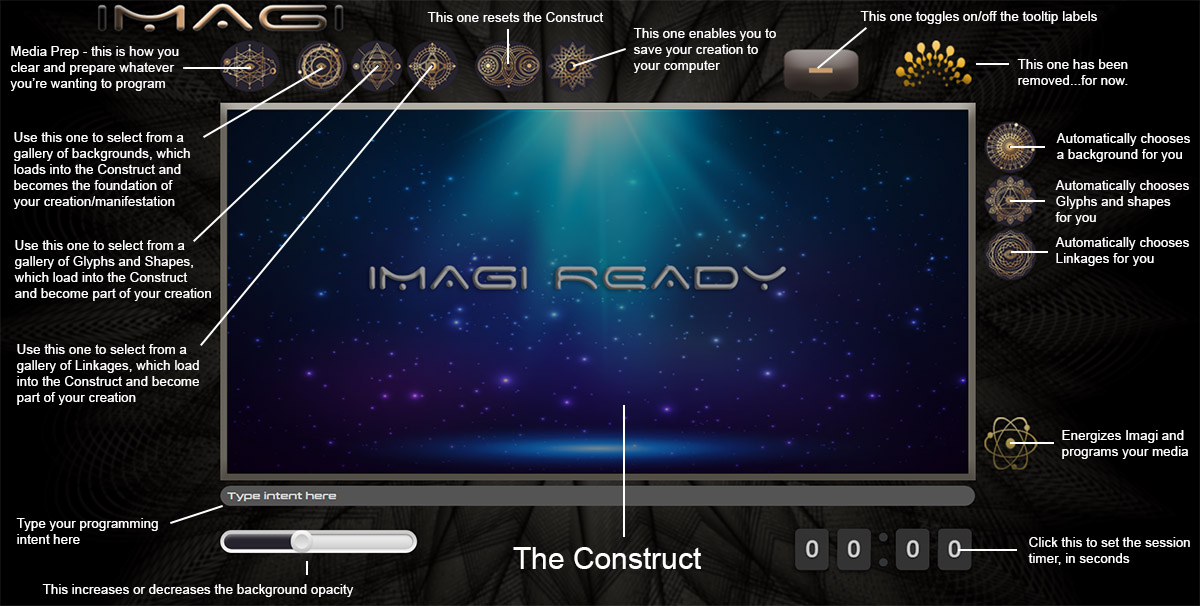
Step 1 – have your media ready, hold it in your mind, and click or tap the Media Prep button. As an example of the wide array of uses, fill a bath, and once it’s filled, hold it in your mind when you click or tap the Media Prep button. Some users will prep a jug of water (or other liquids) just to have it ready without the need for prepping.
Step 2 – click or tap Backgrounds and make a choice, or click or tap Auto Backgrounds.
Step 3 – click or tap Glyphs and make those choices, or use Auto Glyphs instead.
Step 4 – click or tap Linkages, or use Auto Linkages instead.
Left-clicking on any Glyph, Shape or Linkage highlights it. You can then move them around within the Construct, placing them, making your designs. You can also change their sizes, rotate them, and if you right-click, you’ll get a context menu including other editing functions, such as Bring Forward, Send Back, Remove, Duplicate and Remove.
Since all of these can be stacked on top of each other, sending to back or bringing forward will make sense as you create the catalysts for your manifestations.
Tip: to better see the editing frames around the Glyphs and Linkages, reduce the opacity of the background.
Tip: if you want a pure black background, reduce the opacity all the way.
Tip: it isn’t necessary that your Session Construct have anything in it. For example, you can exclude Linkages or Glyphs, if you like. The Backgrounds are beautiful, and can be used for sessions by themselves, if you like.
Tip: clicking or tapping Auto Backgrounds again will randomly load a different one. Clicking either Auto Glyphs or Linkages will load 8 additional Glyphs or Linkages.
Step 5 – set the opacity.
Step 6- set the timer. The default is 22 seconds. It’s seldom necessary to run a session for greater than 60 seconds, but if, as an example, you’d like to have it running for the duration of a shower, then run it for that length.
Tip: the timer slider is sensitive, so if you want finer-tunings for session duration, you can use the arrow keys on your computer or iPad or tablet.
Step 7 – type your intent in the Intent Field
Tip: It isn't necessary to save your images to run the sessions. The Save function is only for sharing and and posting. Subtip: you can re-use those images for the same purpose you built them.
Step 8 - hold the object or media to be programmed in your attention and click or tap Energize.
Tip: a known bug that we're going to not investigate for now is this: if you run a session, and then click or tap anywhere in the Construct, everything inside the Construct frame shifts a few pixels to the right, and down. Where this has any impact is if you use the same design for all your water for, say, a full day, with several sessions. Related to that problem, is even if you don't click or tap anywhere inside the Construct, if you run a session with the same image, it will slightly enlarge for each succeeding session when you click Energize. So here's the tip: if you plan to run several sessions on the same image, don't leave any of your Glyphs or Linkages so close to the edge that after several sessions they're out of the frame.
Tip: Another bug, which ironically might be only on my main laptop, is if the ripple effect is off-center, it's because there is some dimension/proportion math wrong in the communication between the app and your computer. If it's off-center, it will be noticeably up and to the left of the center of the Construct window.
That’s it. It’s all there is to it. The most important part? That you enjoy the act of making your designs. It makes the programming that much more powerful.
THE CONSRUCT GALLERIES EXPLAINED
Media Prep – by media, we mean anything, water or any other liquid, crystals, stones, etc., even the walls or air of your home. Anything works, but we recommend you start with good clean water. Clicking it immediately initiates the clearing and purifying (blank-slating) of whatever it is you’re wanting to program. All you have to do is hold whatever it is in your mind when you click the button, and that makes the conscious, subconscious, and superconscious connections between the source of the energy and your chosen media. This also works just to clear and purify anything you’d like, without programming it. It turns water into a wonderful beverage. It will taste different. It turns average wine into vintage wine, as an example. That sounds crazy, we know, but try it…it works.
Backgrounds – these are the backdrop for your own design. It pleases other levels of yourself to create beautiful things, and in fact helps to clear the connections (or signal lines) and sinks you deeper into them, and even into lower brainwave states. You’ll see what we mean by that. If you want to start a session, and you already know your intent for it, you can use the button that automatically chooses a background. In this way, you’re in effect leaving it to your Metamind to choose for you. This is also true of the Glyphs and Shapes to be automatically chosen, and the Linkages. When you watch the videos, this will make more sense.
Glyphs and Shapes – these are mostly Glyphs, which are very high-level symbols. The first set has been described by experts as “hyper-sigils.” There are 36 of those, and they’re also known as Source Code. They have labels with basic meanings and/or functions. There are 7 of those associated with the chakras, and so, as an example, you can design a session to open, clear and balance all your chakras at the same time just by loading them into the Construct and running a session.
Scrolling down in the Glyphs Gallery, you’ll see the next set of symbols look a little alien. There are 12 of those. These reach deep into the causal equations. Your Metaself is familiar with them and knows what to do with them. Their meanings are essentially beyond our capacity to understand, and defy Earthly language, but they adopt meanings you give, and assign meanings and properties to accomplish things you might not know you need.
The third set are the 12 signs of the zodiac, but those symbols contain far more than just your Sunsign information. One suggested use, of many, is that you use your sign to “oversee” any given session.
Scrolling down, you’ll then see a series of sacred shapes to use in your designs.
Scrolling down farther, you’ll then see two more sets of symbols with basic meanings and designations. The first of these two final sets you might not have ever seen, but you might recognize the last set, which are the symbols of the planets, Chiron and Lilith, and Ascending and Descending Lunar Nodes. As with all symbols, they are much more expanded libraries of information, but their use can be used for any magical operation involving the planets.
Linkages – there are six sets of these Linkages. These are not only about making your designs more aesthetically appealing to you, but you could say represent DNA, mitochondria, energetic influences. With these you can connect sigils, create your own sigils, etc. Their use will make a lot more sense when you watch the videos.


